FREE ON SITE ESTIMATES! CALL 806-782-5800

Why Does Site Prep Matter for Septic Systems? (Spoiler: It's Everything)
Learn the essential steps for septic system excavation and site preparation. From soil analysis to drain-field installation, get expert tips on permits, costs, and avoiding costly mistakes.
UNDERSTANDING SEPTIC SYSTEMS AND COMPNENTS
Red Dirt Ditching and Septic Team
10/6/202910 min read

The Dirt on Digging: What I Wish I'd Known About Septic System Excavation
Look, I'm not going to sugarcoat it—installing a septic system isn't glamorous. But here's the thing: get the excavation and site prep wrong, and you're looking at a nightmare that'll haunt you (and your wallet) for years. I've seen homeowners who skipped proper site evaluation end up with sewage backing into their basements. Not fun.
So let's talk about what actually matters when you're about to dig a massive hole in your backyard.
Why site prep isn't just busywork
You know what? Most people think excavation is just "dig hole, drop tank, done." Wrong. So wrong. The site preparation phase is where you either set yourself up for decades of trouble-free operation or create a ticking time bomb under your lawn.
Here's what happens when you rush it: the soil can't absorb water properly, your drainfield floods, and suddenly you've got a swamp where your garden used to be. Or worse—you contaminate your well water. These aren't hypothetical scenarios. They happen all the time to folks who treat site prep like an afterthought.
The state-approved site evaluation (your first real step)
Before you even think about firing up that excavator, you need a state-approved site evaluation. And no, this isn't just bureaucratic nonsense—it's literally the blueprint for whether your septic system will work or become an expensive disaster.
Here's how it goes down. A licensed site evaluator shows up at your property, and they're not just kicking dirt around randomly. They're conducting what's called a soil analysis, which sounds fancy but makes total sense once you understand it.
First, they dig test pits or bore holes across your property—usually in the area where you're planning to install the drainfield. They're looking at soil layers, checking for things like depth to bedrock, water table levels, and any restrictive layers that could block wastewater movement. I watched an evaluator once hit bedrock at eighteen inches when the homeowner swore they had "great soil." Plans changed real quick that day.
The evaluator documents everything: soil texture at different depths, color (yes, color matters—it tells them about drainage and seasonal water tables), structure, and how the layers interact. They're basically creating a soil profile that shows exactly what's happening beneath your feet. This profile determines whether your site can handle a conventional system or if you'll need something more complex and expensive.
Then comes the percolation test, which ties directly into that soil analysis. The evaluator digs a hole, fills it with water, and measures how fast it drains. They're not doing this once—they do it multiple times to get accurate readings. The perc rate they calculate tells you how quickly effluent will move through your soil, which determines how large your drainfield needs to be.
All of this gets compiled into an official site evaluation report that the state reviews and approves. Without that approval? You're not installing anything. And honestly, that's a good thing because it forces you to work with what you've actually got, not what you hope you have.
Getting to know your dirt (yes, really)
Once you've got that site evaluation in hand, you'll understand exactly what soil you're dealing with. The soil analysis from that evaluation breaks it all down, and suddenly those boring geology terms start making sense.
Sandy soil drains fast—maybe too fast. It's like trying to filter coffee through a screen door. The water goes through, sure, but does it actually get cleaned? The site evaluator's analysis will show you those sandy layers and calculate how much drainfield area you need to compensate. You'll need more square footage because the effluent moves through so quickly.
Loamy soil is the goldilocks option, and your soil analysis will show you a nice balance of sand, silt, and clay particles. It's got enough drainage to keep things moving but enough retention to actually treat the wastewater. If your site evaluation comes back showing predominantly loamy soil with good structure, count yourself lucky. Your drainfield can be more compact, and you won't need special engineering.
Clay soil is your worst nightmare, and the soil analysis won't sugarcoat it. You'll see those dense, tight layers in the test pit photos, and your perc test numbers will be terrible—water sitting for hours instead of draining. Poor drainage means water pools, and pooling water means system failure. The state evaluator will likely recommend an engineered system, which means more money but also a system designed specifically for your challenging conditions.
Silty and rocky soils fall somewhere in between, and honestly? They're wildcards. Your soil analysis might show variable layers—maybe good soil on top with a restrictive layer below. The evaluator maps all of this out so you know exactly where you can and can't install components.
The beautiful thing about having that state-approved site evaluation is you're not guessing. You've got documented proof of what's underground, and that guides every decision from here on out.
Planning your layout (or: don't wing it)
Once you know your soil type and have that approved site evaluation, it's time to figure out where everything goes. This isn't just about convenience—it's about keeping your family safe and your system functional. The site evaluation already gave you some parameters, but now you're getting specific.
First rule? Stay away from water sources. This one's non-negotiable, and it was probably mapped out during your site evaluation. Your septic system needs to be far enough from wells, streams, and lakes that there's zero chance of contamination. Most regulations require at least 50-100 feet, but honestly? More is better. Nobody wants to explain to their neighbors why their well water suddenly smells like a sewer. The evaluator's report will show you exactly where these setbacks are, so there's no ambiguity.
Then you need to work with the slope, not against it. The site evaluation included topographic information for a reason. Gravity is your friend here. A gentle slope helps wastewater flow naturally through your system. Too steep? You'll get erosion and uneven distribution. Too flat? Water doesn't move properly. You're looking for that sweet spot—usually around 1-3% grade. The evaluator already identified the best zones for your drainfield based on slope and soil conditions, so use that information.
And here's something people forget until it's too late—think about access. I can't tell you how many times I've seen systems installed in the worst possible spots because nobody thought about maintenance. You'll need to pump that tank every few years. Make sure the septic company's truck can actually reach it without tearing up your landscaping or neighbor's fence. Factor this in while you're still in the planning phase, when it's just lines on paper.
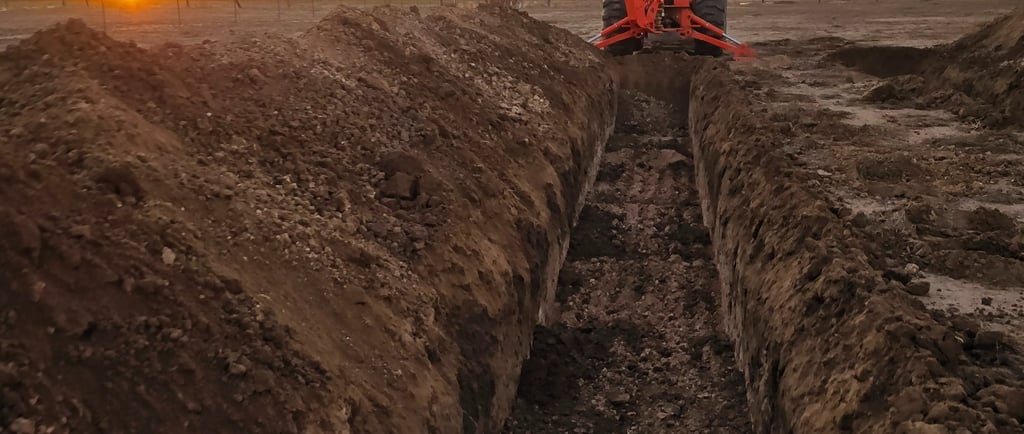
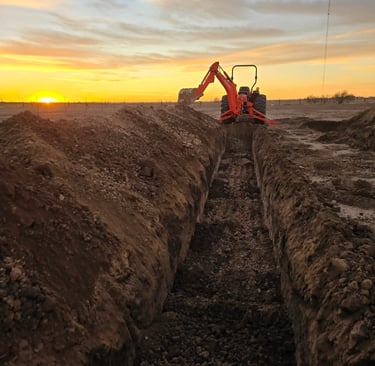
The excavation: where things get real
Alright, time to move some earth. This is where that state-approved site evaluation becomes your bible. You know exactly what soil you're going to hit and at what depth because it's all documented. This is where having the right equipment and knowing what you're doing separates the pros from the disasters.
When it comes to tools you actually need, don't cheap out here. A backhoe or excavator isn't optional for most installations—this isn't a DIY shovel job unless you've got a month to spare and enjoy backbreaking labor. You'll also want laser levels because eyeballing the slope is how you end up with pools of standing water where they shouldn't be.
The process goes step by step, and skipping any part of it is asking for trouble. First, you mark everything out according to your approved site plan. Flags, spray paint, whatever works. You're making a roadmap so you don't accidentally dig where you shouldn't. That site evaluation report? Keep it on hand. It tells you how deep you can go before hitting restrictive layers or high water tables.
Then you dig the pit for your septic tank. It needs to be deep enough for proper drainage but not so deep you're hitting groundwater—something your soil analysis already identified. If the evaluator found the water table at four feet, you're designing around that. You can't just ignore it and dig deeper.
Next come the trenches for your drainfield pipes, and this is where understanding the flow matters. See, your septic tank does the initial work of separating solids from liquids, but that liquid effluent needs somewhere to go. It flows out of the tank and into the drainfield, where it gets naturally treated as it percolates through the soil. Those trenches you're digging? They're creating the pathway for that effluent to spread out and filter through layers of gravel and soil before it eventually reaches the groundwater—clean and safe.
The soil analysis told you exactly which soil layers will do this filtering work and how fast they'll do it. If you've got good loamy soil at eighteen to thirty-six inches depth, that's where your drainfield pipes need to sit. Not shallower where the soil might freeze or tree roots invade. Not deeper where you might hit that clay layer the evaluator documented.
These trenches need consistent slope, which is harder than it sounds when you're moving tons of dirt. Too steep and the effluent rushes through without proper treatment. Too flat and it doesn't flow at all, just sits there creating a backup. The drainfield is essentially nature's filtration system, but it only works if the excavation sets it up right—and if you're placing it in the soil layers that your site evaluation identified as suitable.
Finally, backfilling. You can't just dump dirt back in and call it done. It needs to be compacted properly or you'll end up with settling, which can crack pipes and create all sorts of problems down the line. Those pipes carrying effluent from your tank to the drainfield need to stay intact and properly sloped, or you're looking at expensive repairs.
The red tape (yes, it matters)
Nobody likes dealing with permits and inspections, but here's the reality: skip this step and you could be forced to dig everything up and start over. I've seen it happen. It's expensive, embarrassing, and completely avoidable.
What you'll need includes permits from your local health department or environmental agency—and they'll want to see that approved site evaluation before they issue anything. Then come inspections at multiple stages: usually after excavation (to verify you're digging where and how deep the site evaluation specified), after installation (to check that everything matches the approved design), and sometimes a final inspection before you can cover everything up.
You'll need proof that you're meeting setback requirements from property lines, buildings, and water sources—all of which were documented in your site evaluation. And you'll need documentation that your tank size and drainfield design meet local codes and match what the soil analysis says you need.
Every municipality has different rules. Some are straightforward, others make you want to pull your hair out. But you've got to follow them. And here's the thing: that state-approved site evaluation actually makes compliance easier because it's already vetted. You're not arguing with inspectors about soil conditions—it's right there in black and white from a licensed evaluator.
Keeping it running (because you're not done yet)
Installing the system is just the beginning. You wouldn't buy a car and never change the oil, right? Same principle applies here.
The maintenance reality is this: get your system inspected annually. Yeah, it costs money. You know what costs more? Emergency repairs when your system fails on Thanksgiving weekend.
Pump that tank every 3-5 years, depending on your household size. If you've got a big family, lean toward every 2-3 years. The pumping removes solids that build up over time. Skip it, and those solids eventually clog your drainfield. Then you're looking at thousands in repairs or even a complete system replacement.
Watch what goes down your drains. Your septic system isn't a garbage disposal. No grease, no "flushable" wipes (they're not actually flushable), no harsh chemicals. Treat it right and it'll last 25-30 years. Abuse it and you'll be lucky to get 10.
Household size matters more than you'd think. Living alone or with one other person? You can probably get away with inspections every year and pumping every five years. Family of 3-4? Still annual inspections, but pump every 3-4 years. Five or more people? You're putting serious load on that system. Consider biannual inspections and pumping every 2-3 years.
The bottom line on costs
Let's talk money because that's what everyone wants to know. A basic septic system installation runs anywhere from $3,000 to $10,000 for most residential properties. But that's basic. If you've got difficult soil—the kind that shows up poorly in soil analysis and requires engineered solutions—or you need an alternative system because your site evaluation revealed challenging conditions? You could be looking at $15,000-$25,000.
Don't forget to factor in the cost of that state-approved site evaluation itself, which typically runs $500-$1,500 depending on your location and property complexity. But honestly? It's the cheapest insurance policy you'll ever buy. Spending a thousand bucks upfront to know exactly what you're dealing with beats spending ten thousand on a failed system later.
The installation itself usually takes 3-5 days if weather cooperates and there aren't surprises underground. Though with a good site evaluation, surprises are rare—you already know what's down there.
Red flags to watch for
How do you know if your system's failing? The signs are pretty obvious once you know what to look for: drains moving slower than usual, sewage backing up into your house (this is the "drop everything and call someone" moment), mysterious foul odors around your yard, and patches of grass that are suddenly way greener than everything else (sounds good, actually means your drainfield is saturated with effluent that isn't properly filtering through the soil like it should).
Catch these early and you might avoid major repairs. Ignore them and you're in for a world of hurt.
Final thoughts
Here's what it comes down to: excavation and site preparation for a septic system isn't sexy work, but it's critical work. Cut corners here and you'll pay for it—literally—for years to come.
Start with that state-approved site evaluation and soil analysis. Let the professionals tell you what you're working with. Take the time to understand your soil properly. Plan your layout thoughtfully based on real data, not guesswork. Use the right equipment and techniques during excavation. Follow the regulations, even when they seem annoying. And once it's installed, maintain it like your home depends on it (because it does).
Done right, a septic system is a reliable workhorse that'll handle your household's wastewater treatment for decades. The effluent leaving your tank will flow smoothly to the drainfield, filter naturally through the soil layers that were carefully documented in your site evaluation, and complete its journey without you ever having to think twice about it. Done wrong? Well, let's just say you don't want to find out.
So whether you're a homeowner planning your first septic installation or a contractor trying to do right by your clients, remember: the boring technical stuff in the beginning saves everyone from disaster later. That soil analysis might seem like overkill until it prevents you from installing a system that would've failed within a year. And honestly? That's worth celebrating.
Now go forth and dig smart.